Monday, December 10, 2012

Today In Art Class: 12/6/2012

10:30am - I overslept and a text from painting professor reads "Come to class we are having a party/dancing!"

11:00am - Get to class; there is no dancing, but there are several people are gathering bugs to look at under a microscope?....  Just because!

2:00pm - Printmaking professor starts to tell a story about two freak kids in Florida ("freak" being the derogative term used after hippies went out of style)....      

4:25pm - Printmaking professor is reminded he didn't finish the story; his response is that the two freak kids really liked bom-pops!! ...(End of story)


- by Dana Potter, Art Major

Tuesday, November 20, 2012

FFT: Being an Art Student is Terrifying

I hear a lot of "oh being an art student is easy. You get to do what you love every day. You don't have to be smart, you don't have to work that hard, you don't have to do... anything." 
I don't think people who say this have any idea what actually goes into being an art student.
Being an art student is hard.
Being an art student is terrifying.
Being an art student is perhaps the most important thing I've done. It's maybe the only thing I think I've done right in my life. And I wouldn't change it for the world.

Yes, I get to do what I love every day. But that doesn't mean it isn't work. I struggle with projects like you might struggle over math problems. Except I'll come up with an answer that is completely different than what someone who is sitting right next to me might come up with. And that's okay. That's expected. Actually, if you come up with the same idea as whoever is sitting next to you, odds are, you are going to fail.

It gives me a sense of satisfaction to struggle over these problems, to work through thoughts and emotions, and come up with better work because of it. When my entire life is going down the drain, my art only gets better. I want to say that there's a reason to be thankful for life being shitty.

I don't know how I want to justify my choice to be an art student, though.
The first problem, I guess, is all the people who say "But what are you going to do with an art major?"
My answer: I don't know.
Why would I know?
Why would I want to know?
Wouldn't that take all the fun out of life?
I'd much rather take things one day at a time, figure things out as I go along, rather than have a plan and follow it to a "T". Because what if things go wrong? How could I pick my life up after that? Would I try to continue down that path, or would I have to scrap everything I've done in the past and start over? No. And I get that everyone is different about this, but that would not make me happy.
I need a little spontaneity, a little spice in my life.

I've already addressed people that say that being an art major is easy.

But my main point: being an art major is terrifying.

You pour all your energy, all your soul and heart, your literal (and figurative) blood, sweat, and tears into a piece, and then... you put it out into the world. How is that not the most terrifying thing in the world? To know that your peers, your teachers, people you want to like and respect you, are judging what you think and feel and create. 
That to be the best, you have to be torn down and built back up. 
That to excel and succeed, you have to fail. 

And people say that I took the "easy" path in college. That I am wasting my potential. 
They can't see it. 
That not only am I doing what I love, what makes me happy, but I am challenging myself. I am working harder than they could know. I may not be spending every hour of free time on a lab report, but how is my work not as important?


Saturday, October 20, 2012

Art Building Madness

You know those crazy people walking around with weird things on their heads? The ones always locking themselves in display cases while they sit around doing some crazy thing or another? The ones who put everything, every random thing they can imagine, on their walls so that it becomes one giant collage and you can't even see the walls anymore?
Those are art students.

There's always crazy crazy stuff going on on the walls in the art building.


You never know what you're going to find in the art building.


Sunday, October 7, 2012

Today In Art Class: 10/7/2012

Today I opened my school email box, to find a letter from my art professor.
The subject line read: More Advice
All the email contained was a link to this youtube video:


I just find it hilarious that this constitutes as advice.


Tuesday, September 25, 2012

Thrifting Remake: From Shirt to Skirt


Every other Sunday, out local Goodwill has a sale. But not just any sale. A super sale. You can get anything in the store, anything at all (except for maybe furniture) for a dollar. You heard me. One. Dollar. Now, obviously this is always the highlight of my week. With $12 worth of Goodwill clothes in my bag, and Dana's sewing machine on my desk, I'm ready for a fun week of projects!

Obviously this shirt is fantastic. Well, maybe not the shirt itself, but who doesn't love a graphic print? And this one is pretty fantastic. One of the best ones I've seen. But the shirt itself is 8 sizes too big, and has an absolutely terrible crocheted lace "bib".
But the print. It caught my eye as soon as I saw it, and I just knew I could make something fantastic.

The idea came as soon as I picked it up. I had some extra elastic back in my craft bin, and I was going to make a skirt.
I cut off the bust of the shirt, sewed a loop for my elastic, threaded it through (with the help of a paper clip), and sewed it tight and shut.
And voila! A brand new skirt to rock around campus. With leggings on the colder days of course.
With my red boots and a thrifted red belt, I was ready to head out on the town!

Cardigan: Goodwill. Shirt: Thrifted. Belt: Thrifted. Leggings: Target. Boots: Washington DC. Necklace: Claire's.
Thanks to the roomie for a lovely picture!

That's all for today, my dears! Stay tuned for more fun projects and thrifting adventures!


Saturday, September 1, 2012

DIY: Fix Your Boring Magnets

If you are really quite bored, and need an easy, fun, useless, and random crafting idea try sprucing up your fridge magnets (it'll be great):
First off there are those random and usually geometric magnets, of which you don't really know where they came from, like this pinkish-redish one to the left in the photo.  You could try covering those magnets with fabric, just with hot glue; you could also Modge-Podge it with magazine pages.  Just do something interesting with it:


Then there are those magnets that you got from going to that one thing in a packet with a bunch of other random things...I love my University but I think this magnet could be more interesting.  


 Again, chose random crafty things and put them all together ontop of the magnet with glue-sticks, hot-glue, and modge-podge, all of it until it comes out interesting


Or you could altogether just make a magnet.  On the back of this mouse trap I glued some magnets...


 Then I glued a bunch of random stuff on the front.  Why a mouse-trap? Because you can use the bar-spring to hold larger amounts of pages if necessary for some reason.  (Note: Also if you can't tell, I was studying Dada in school at the time this was made and I think it shows!)


 And there's a whole new thought for the day!


Thursday, August 30, 2012

DIY: Fabric Keychain and Key Wrap


So everyone's probably wondering, "What are we up to today, y'all?"
Well, I'm here to tell you that you're in for a treat today! A slightly less crazy treat than before, but a treat nonetheless.
Who else absolutely hates it when you get a bunch of keys with a terribly ugly keychain, and no way to tell them apart? I can't be the only one. Well, I've sure got good news for you then! 

Today's DIY comes to you in two parts. 


Part 1: The Keychain

Story time: I picked up my keys to work the other day, and the lady behind the counter gave them to me saying, "Each key costs $25 to replace if you lose them. You have $50 worth of keys right here." (As if I couldn't add. Like I'm not in college or anything.) "DON'T LOSE THEM." 
Got it, ma'am. Well, just to make her happy, I plan on never losing my keys! Because if I lose my keys, I lose this fabulous keychain!

Making this keychain is super easy.


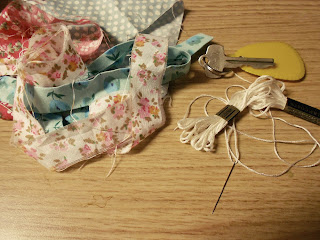
Materials you shall need:
keys (and a keychain)
fabric scraps
scissors
embroidery floss and a (threaded) needle
cotton balls (not pictured)


First, you'll want to cut out a shape out of the largest of your fabric scraps. Whatever shape you want. I did an oval-y egg shape in blue with white polka-dots. Make sure you cut out two of this shape.
Next, you'll want to cut a strip of a different fabric about an inch or so long, and about half as wide. This will be the part that goes around the keychain. If you want a clean edge, you can fold each of the long sides under a little bit (I did, and I really should have taken a picture of it too...).
You're going to fold this strip into a loop, and place it halfway in between the main pieces of the keychain. Make sure, in this step, that on the main part of the keychain, the wrong sides are facing each other (we're going to leave the edge unfinished) and that on the loop, the closed end is out.
Now you can start sewing! I started where the loop was, so I ended up going through a couple layers of fabric. Make sure the loop is in there good and tight, and sew almost all the way around your shape.
When you get close to the end of your sewing, stuff a few fluffed-up cotton balls in there to make your keychain all nice and puffy and squishy!
Finish sewing the rest of the way around your shape, tie it off, and voila! A beautiful keychain! Granted, you have to still get it on the keyring, but that shouldn't be hard at all. Just slide it around until it's good and on there.
I felt like mine was missing something, so I made a quick fabric flower (out of a circled strip of a contrasting fabric) and stitched it onto the main keychain real quick. This part is optional, though. Purely up to you.
Voila! (Picture #2, here.)

Part 2: The Key "Wrap"
Now, I'm sure you hate it when you can't for the life of you figure out which key goes to which lock. Especially when they're almost the same shape.
It's a struggle. Every day. 
I know they make those super cute covers for keys and whatnot. They're not that expensive, really. And I had some last year. They just... fell apart. About halfway through the year, my cute owl covers for my keys were useless.
Well, I came up with a clever, durable yet non-permanent (we wouldn't want Kelly to have to pay $50 for a set of "ruined"--read "embellished"--keys, now, would we?) solution to this pressing problem.
On one key, (I took the one to my office, as opposed to the one to the building), I made this cute little wrap. Super easy, super cute, and now you can make one too!

What you need:
key
fabric scraps
masking tape
glue

Here, I cut a bit of masking tape, enough to go around my key about one-and-a-half times, hot glued a strip of fabric to it, and wrapped it around the head of the key.
What did I tell you? Super easy, right?


This would be cute with just about anything. Fabric, paper, fake flowers... pompoms.... beatles... THE Beatles... You could also just wrap a bit of tape around there and doodle. Or just a piece of colorful duct tape or something. Get creative.
You can do it!


Saturday, August 25, 2012

Thrifting! For the win!

Dear millions of lovely readers,

We come to you this August from the sweltering campus of Northern Iowa, back from a day's haul of Thrifting Fun Times, sharing our lives with you.

Setting: Dana's dorm room

Dana and Kelly are sitting among a pile of clothes and random Goodwill finds.
Dana turns to Kelly.

Dana: Hey. Let's start a blog.
Kelly: YES.

So here we are.

While Kelly makes the blog, Dana dresses up pandas.

Dana: This is fun. He looks so foxy right now. Or she.
            This one looks like a... a... rodent.
            Now I know how those crazy Cabbage Patch people feel.


Kelly: I shall call him "Hans." And he shall be Swedish. And he shall be my Swedish Three-Legged Cat Necklace. 


Our mascot. The three-legged cat necklace named Hans.