Monday, April 22, 2013

Scott Anderson: Contemporary Painter


 Scott Anderson


            When starting a painting, Scott finds that he often follows a pattern of a process. He usually works from a photo that he has taken or a found photo as a blueprint.  However, he does not copy the photo, he uses it as the base idea only;  often times he says that he even pushes himself away from that original blueprint anyway.  His main example of this was a painting he did of a boar’s head, which he ended up turning on its side and made it into a sort of geometric landscape. 
            He sometimes finds inspiration from things that are found in his life.  Wunderkammer is a German word that means collection of small things to represent curiosities or rarities in worldly items.  You see the influence of Wunderkammer in his works along with interior design (the interior design influence comes from his mother and his wife).  Another influence of his is Mythology.  He finds the progression/change through time to be intriguing.  An example of this change in history is how the ancient god Odin translated to Norwegian gnomes and then to Santa Clause.  An example of a work of his that shows this progression is Funeral (not shown) which depicts a Viking Funeral that looks futuristic but historical simultaneously.  He also finds influence from little shops in his town that sell folk art.  A way that he translated those ideas into his works was the painting Under Earth (not shown). Finally, he has an interest in utopia/dystopia society in relation to the future and world fairs.  This is clearly shown in his painting that depicts the Heliport building.
            He also draws influence from historical famous artists, in particular: Robert Rauschenberg.  Anderson spoke of his person connection to Robert Rauschenberg’s works from the 50s and 60s.  He had a special interest in Rauschenberg’s ability to take images that by themselves can imply strong narratives but Rauschenberg places them in a way that they lose that meaning and just become part of the painting.  This is something that Anderson, too, has mastered in his own works.  His identifiable imagery gets well mixed into a confusion of interior/exterior spaces and geometric patterns.  Anderson’s works seem chaotic, but really they are quite compositionally masterful. 

Wednesday, March 20, 2013

Alexandra Levasseur: One Drawing a Day

Alexandra Levasseur

Let Me Sleep, acrylic & colored pencils on paper, 14x11"
Alexandra Levasseur, who lives and works in Quebec, challenged herself to a "therapeutic investigation" by completing one drawing a day from 2011 - 2012. The final project consists of 35 pieces, each 11x14", each made with acrylic painting and colored pencils on paper.

"My objective is to explore the spontaneity and inspiration that every morning gives me, either by environmental or emotional circumstances - states of mind, energy, desires, etc." Because this project began in the fall, Levasseur found herself gravitating towards the impressions and perceptions she finds of autumn and winter in Quebec: the increasing tendency toward hibernation and laziness is a common phenomenon and mood during the dark and cold months.


This need for comfort and warmth is illustrated through the physical comfort of the blankets, pillows, and wool clothes that surround her figures.

Winter Bed, acrylic & colored pencils on paper, 14x11"

 In contrast, the walls and coverings often feature flowers and bright colors, elements of spring in which the figure can hide.
Couverture, acrylic & colored pencils on paper, 11x14"

Levasseur's figures encapsulate the difficulty of waking and getting up, the tendency to oversleep, the anxiety, the irritability that comes hand in hand with the cold and the dark winter. Whether these figures are still in bed or are going about their day, these feelings linger.

In her statement, written before the final completion of the project, Levasseur states that she hopes to bring the "diary of seasonal emotional transmutations" through to the spring and summer as the irritability and anxiety of winter disappears.

Not only does this subject matter pertain to my own experiences, but also I find myself drawn to these pieces in general. What I really seem to respond to is the obvious marriage of illustration as an art form and the overt need for telling a story. Each piece does tell its own story. Levasseur's style in general seems to include the fragmentation of the form itself apparent in the samples shown here; I think this only adds to the narrative aspect of these pieces. It sets up a continuous narrative of sorts. At the very least, it establishes movement through the piece, further adding to the anxiety and the irritability she discusses.

Saturday, March 9, 2013

Insightful at a Young Age


Dieter Roth: Artist 1930-1988
At the age of ten in 1940, Roth was put into membership with a paramilitary organization of the Hitler Youth,the Pimpfe (Cubs).  He was removed from Germany for a period of time in 1943, and he began writing and drawing frequently commenting on the society’s anxiety from war being a burden on the individual. In 1945 he wrote:
“And as long as this war is raging-it is probably my inner war too - one of development - I will not have personality for the world outside. The war has to be over first, the big one for the development and ultimately the peace of mankind, and the same, small one inside me, then mankind will be mankind, then I will be Dieter.”

Saturday, March 2, 2013

Lee Price: American Figurative Realist Oil Painter

Lee Price

Working out of New York this contemporary oil painter focuses on overhead self-portraits.  The viewer is positioned directly above the subject, forcing a literal play-on-words of the viewer looking down on the figure.  The figure's posture responds to this overhead view sometimes with tight-crouching shoulders that hide the body or sometimes with a more relaxed but heavy pose.  Figurative heaviness is apparent in all of her works exemplified by the presence of weighty foods.  The food in combination with settings of bathtubs, beds, and comfy chairs suggests the figure is fetishizing lethargic activities.

Full, Oil on Linen, 44” X 54”


Lemon Meringue, Oil on Linen, 32" x 72"


Price has commented that her works are a comment on "body image, feminism, and our cultural relationship to food."


Butter, Oil on Linen, 66" x 44"


What sparks questions for me in her work is the process.  To capture self-portraits that feature the full body from an overhead angle she must work either with a large-mirror (most obviously) or photographs.  (Or she very adequately renders figures without looking at any reference)  So if she does work from a photograph (to be able to render the proportions of her back, such as in the piece above) why paint it? She can many these works using photography.  Contemporary artists must continuously be conscious of the effects of technologies on the appreciation of art.  These are immensely impressive realist paintings show off her skill as a painter, but what about painting is important for the viewer to understand this piece?

http://www.leepricestudio.com/painting13.html

DIY: Tie Headbands


Have you ever felt like you paid way too much for a headband? Or tried to make your own and spent too much money on fabrics? Dana has. And if she were here (and she is), she would tell you to listen up because I have great news for you!
You know what makes fantastic and unexpected headbands? Men's ties.

My dad has a ton that he doesn't wear any more, but I'm sure that he would not appreciate me cutting them up. So instead, Dana and I picked up  some good ones at thrift stores around town. Goodwill seems to be a good one, but sometimes it can get a bit pricey, as far as thrift stores go. Lucky for us, we just keep going on days when they have $1 sales. Everything in the store is only $1. Seriously. Best. Thing. Ever.
Punctuation makes things dramatic-ly emphasized, you know.
I picked up eight different ties in one go!
So naturally, this crafty chica was ready to get to work straight away. (Did I really just call myself a "crafty chica?" Guess so... Hmmm... maybe the extent of my Spanish is not just "taco." Who knew.)

First step: I cut the skinny end of the tie so it was just long enough to tie around my head. (If you cut it a bit too short, there's a piece of white canvas on the inside of the tie that you can take out. It'll give you another half-inch of room or so, depending on how thick the tie is. Just stich the back right on up once you're done, and it's on to Step 2!)
Second step: I like to fold down the end that you cut in a triangle. This way, it kind of mimics the actual end of the tie, the one that you won't do anything with other than maybe cut the materials tag off, if it's even there. Or, if you want to advertise that your tie is 100% silk (and who doesn't love bragging now and then), then by all means, leave the thing on there!
Brag away. I won't tell you what to do. Much.
Third step: Now's when you would sew up that open (now folded) end to the headband. Make it as neat as you like. Sometimes I like to let the stitches show, give it a more handmade feel. Sometimes I make it as neat as I can, just to be a bit more polished.

And voila! Instant headband! Just tie it around your head, and you're ready to par-tay. Tea party that is. Might as well get fancy with it.
If you're feeling super crafty and have some floral wire or even jewelry wire hanging around, you could try putting a wire down the center of the headband (on the inside, of course) to make it super chic and fashionable. And to wear with a bit more ease.

Like I said, I picked up eight of these bad boys at various thrift stores earlier this weekend, and I "converted" all of them to headbands in an hour or two.
So experiment, play around with things, and if you come up with any bright ideas for the other half of the tie, let us know!
Dana might have a treat for y'all later on the tie front,  but I'll try not to spoil things.

Until next time, my dears!

Seven out of eight are chilling on my floor. Next project: storage...


Sunday, January 20, 2013

The Neverending Hallway of... Stuff?


All we were told for this project was to get a suitcase.
Little did we know that it would take us down  a dark hallway of thrifting misfortune...

Well, maybe not misfortune. That sounds a bit ominous.
Overly dramatic much, Kelly?


Monday, December 10, 2012

Today In Art Class: 12/6/2012

10:30am - I overslept and a text from painting professor reads "Come to class we are having a party/dancing!"

11:00am - Get to class; there is no dancing, but there are several people are gathering bugs to look at under a microscope?....  Just because!

2:00pm - Printmaking professor starts to tell a story about two freak kids in Florida ("freak" being the derogative term used after hippies went out of style)....      

4:25pm - Printmaking professor is reminded he didn't finish the story; his response is that the two freak kids really liked bom-pops!! ...(End of story)


- by Dana Potter, Art Major

Tuesday, November 20, 2012

FFT: Being an Art Student is Terrifying

I hear a lot of "oh being an art student is easy. You get to do what you love every day. You don't have to be smart, you don't have to work that hard, you don't have to do... anything." 
I don't think people who say this have any idea what actually goes into being an art student.
Being an art student is hard.
Being an art student is terrifying.
Being an art student is perhaps the most important thing I've done. It's maybe the only thing I think I've done right in my life. And I wouldn't change it for the world.

Yes, I get to do what I love every day. But that doesn't mean it isn't work. I struggle with projects like you might struggle over math problems. Except I'll come up with an answer that is completely different than what someone who is sitting right next to me might come up with. And that's okay. That's expected. Actually, if you come up with the same idea as whoever is sitting next to you, odds are, you are going to fail.

It gives me a sense of satisfaction to struggle over these problems, to work through thoughts and emotions, and come up with better work because of it. When my entire life is going down the drain, my art only gets better. I want to say that there's a reason to be thankful for life being shitty.

I don't know how I want to justify my choice to be an art student, though.
The first problem, I guess, is all the people who say "But what are you going to do with an art major?"
My answer: I don't know.
Why would I know?
Why would I want to know?
Wouldn't that take all the fun out of life?
I'd much rather take things one day at a time, figure things out as I go along, rather than have a plan and follow it to a "T". Because what if things go wrong? How could I pick my life up after that? Would I try to continue down that path, or would I have to scrap everything I've done in the past and start over? No. And I get that everyone is different about this, but that would not make me happy.
I need a little spontaneity, a little spice in my life.

I've already addressed people that say that being an art major is easy.

But my main point: being an art major is terrifying.

You pour all your energy, all your soul and heart, your literal (and figurative) blood, sweat, and tears into a piece, and then... you put it out into the world. How is that not the most terrifying thing in the world? To know that your peers, your teachers, people you want to like and respect you, are judging what you think and feel and create. 
That to be the best, you have to be torn down and built back up. 
That to excel and succeed, you have to fail. 

And people say that I took the "easy" path in college. That I am wasting my potential. 
They can't see it. 
That not only am I doing what I love, what makes me happy, but I am challenging myself. I am working harder than they could know. I may not be spending every hour of free time on a lab report, but how is my work not as important?


Saturday, October 20, 2012

Art Building Madness

You know those crazy people walking around with weird things on their heads? The ones always locking themselves in display cases while they sit around doing some crazy thing or another? The ones who put everything, every random thing they can imagine, on their walls so that it becomes one giant collage and you can't even see the walls anymore?
Those are art students.

There's always crazy crazy stuff going on on the walls in the art building.


You never know what you're going to find in the art building.


Sunday, October 7, 2012

Today In Art Class: 10/7/2012

Today I opened my school email box, to find a letter from my art professor.
The subject line read: More Advice
All the email contained was a link to this youtube video:


I just find it hilarious that this constitutes as advice.


Tuesday, September 25, 2012

Thrifting Remake: From Shirt to Skirt


Every other Sunday, out local Goodwill has a sale. But not just any sale. A super sale. You can get anything in the store, anything at all (except for maybe furniture) for a dollar. You heard me. One. Dollar. Now, obviously this is always the highlight of my week. With $12 worth of Goodwill clothes in my bag, and Dana's sewing machine on my desk, I'm ready for a fun week of projects!

Obviously this shirt is fantastic. Well, maybe not the shirt itself, but who doesn't love a graphic print? And this one is pretty fantastic. One of the best ones I've seen. But the shirt itself is 8 sizes too big, and has an absolutely terrible crocheted lace "bib".
But the print. It caught my eye as soon as I saw it, and I just knew I could make something fantastic.

The idea came as soon as I picked it up. I had some extra elastic back in my craft bin, and I was going to make a skirt.
I cut off the bust of the shirt, sewed a loop for my elastic, threaded it through (with the help of a paper clip), and sewed it tight and shut.
And voila! A brand new skirt to rock around campus. With leggings on the colder days of course.
With my red boots and a thrifted red belt, I was ready to head out on the town!

Cardigan: Goodwill. Shirt: Thrifted. Belt: Thrifted. Leggings: Target. Boots: Washington DC. Necklace: Claire's.
Thanks to the roomie for a lovely picture!

That's all for today, my dears! Stay tuned for more fun projects and thrifting adventures!


Saturday, September 1, 2012

DIY: Fix Your Boring Magnets

If you are really quite bored, and need an easy, fun, useless, and random crafting idea try sprucing up your fridge magnets (it'll be great):
First off there are those random and usually geometric magnets, of which you don't really know where they came from, like this pinkish-redish one to the left in the photo.  You could try covering those magnets with fabric, just with hot glue; you could also Modge-Podge it with magazine pages.  Just do something interesting with it:


Then there are those magnets that you got from going to that one thing in a packet with a bunch of other random things...I love my University but I think this magnet could be more interesting.  


 Again, chose random crafty things and put them all together ontop of the magnet with glue-sticks, hot-glue, and modge-podge, all of it until it comes out interesting


Or you could altogether just make a magnet.  On the back of this mouse trap I glued some magnets...


 Then I glued a bunch of random stuff on the front.  Why a mouse-trap? Because you can use the bar-spring to hold larger amounts of pages if necessary for some reason.  (Note: Also if you can't tell, I was studying Dada in school at the time this was made and I think it shows!)


 And there's a whole new thought for the day!


Thursday, August 30, 2012

DIY: Fabric Keychain and Key Wrap


So everyone's probably wondering, "What are we up to today, y'all?"
Well, I'm here to tell you that you're in for a treat today! A slightly less crazy treat than before, but a treat nonetheless.
Who else absolutely hates it when you get a bunch of keys with a terribly ugly keychain, and no way to tell them apart? I can't be the only one. Well, I've sure got good news for you then! 

Today's DIY comes to you in two parts. 


Part 1: The Keychain

Story time: I picked up my keys to work the other day, and the lady behind the counter gave them to me saying, "Each key costs $25 to replace if you lose them. You have $50 worth of keys right here." (As if I couldn't add. Like I'm not in college or anything.) "DON'T LOSE THEM." 
Got it, ma'am. Well, just to make her happy, I plan on never losing my keys! Because if I lose my keys, I lose this fabulous keychain!

Making this keychain is super easy.


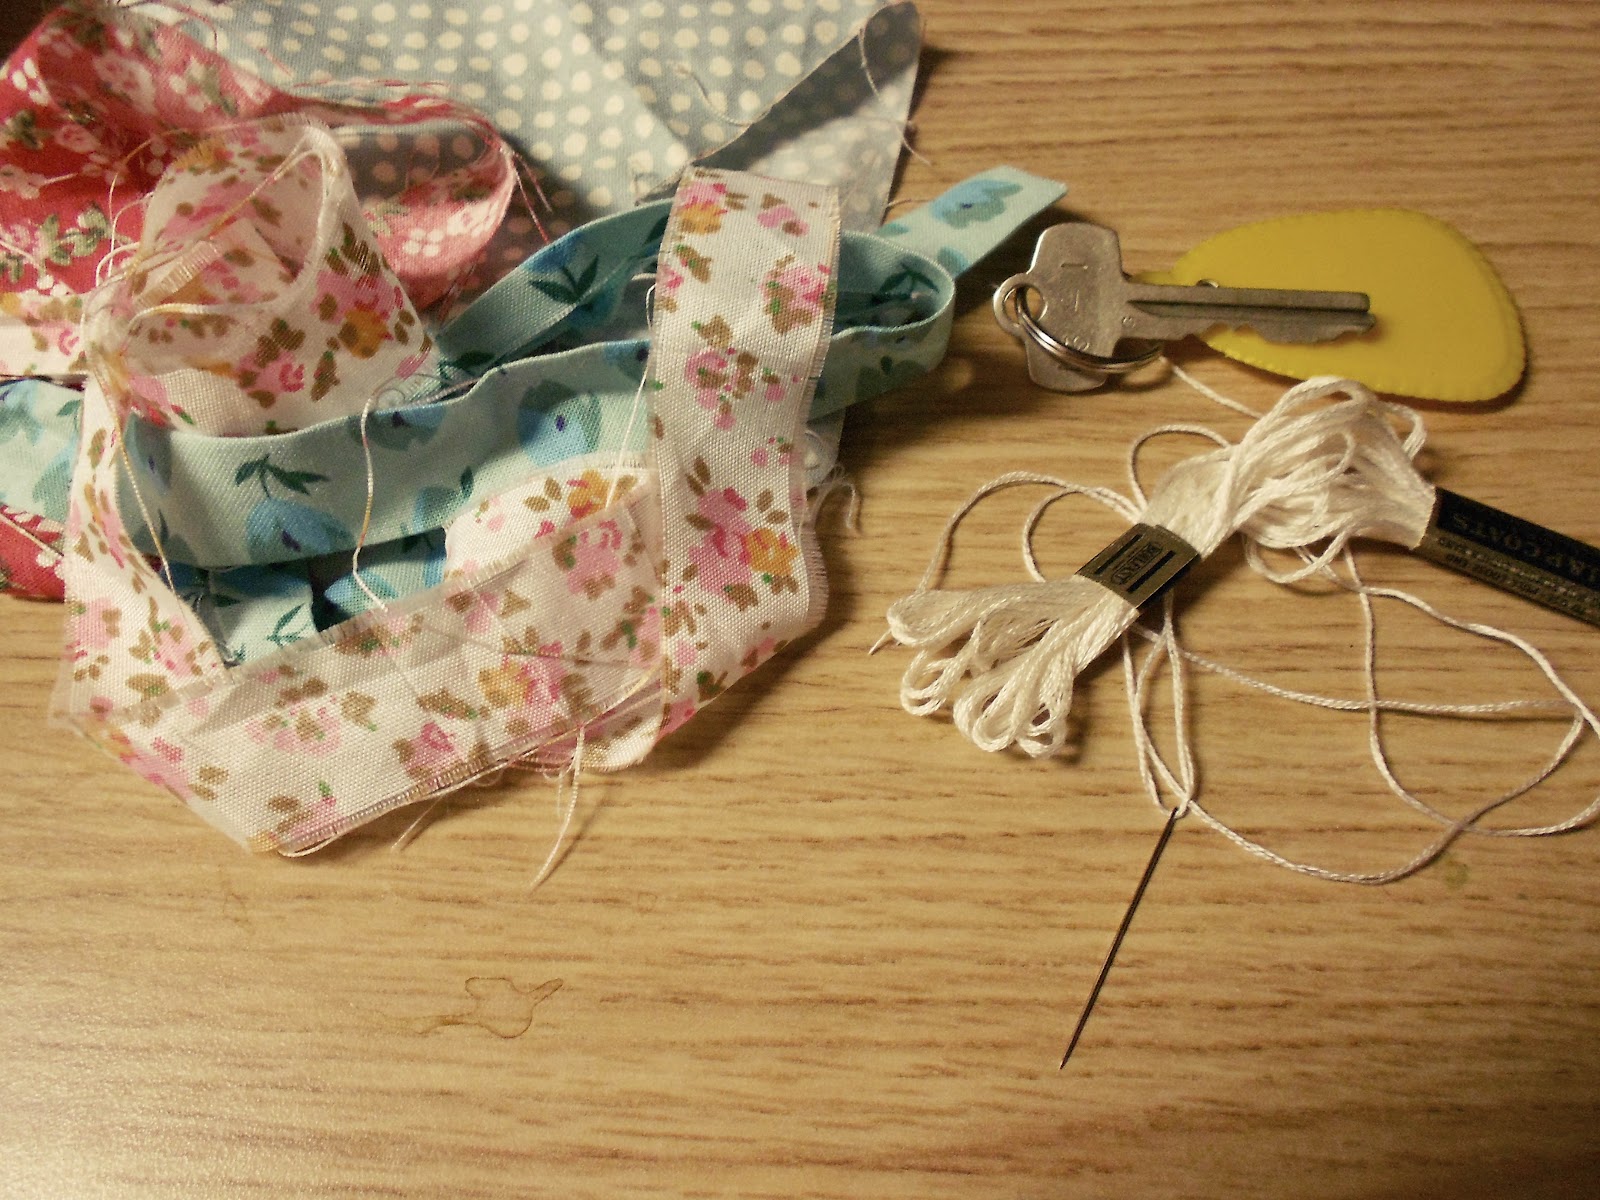
Materials you shall need:
keys (and a keychain)
fabric scraps
scissors
embroidery floss and a (threaded) needle
cotton balls (not pictured)


First, you'll want to cut out a shape out of the largest of your fabric scraps. Whatever shape you want. I did an oval-y egg shape in blue with white polka-dots. Make sure you cut out two of this shape.
Next, you'll want to cut a strip of a different fabric about an inch or so long, and about half as wide. This will be the part that goes around the keychain. If you want a clean edge, you can fold each of the long sides under a little bit (I did, and I really should have taken a picture of it too...).
You're going to fold this strip into a loop, and place it halfway in between the main pieces of the keychain. Make sure, in this step, that on the main part of the keychain, the wrong sides are facing each other (we're going to leave the edge unfinished) and that on the loop, the closed end is out.
Now you can start sewing! I started where the loop was, so I ended up going through a couple layers of fabric. Make sure the loop is in there good and tight, and sew almost all the way around your shape.
When you get close to the end of your sewing, stuff a few fluffed-up cotton balls in there to make your keychain all nice and puffy and squishy!
Finish sewing the rest of the way around your shape, tie it off, and voila! A beautiful keychain! Granted, you have to still get it on the keyring, but that shouldn't be hard at all. Just slide it around until it's good and on there.
I felt like mine was missing something, so I made a quick fabric flower (out of a circled strip of a contrasting fabric) and stitched it onto the main keychain real quick. This part is optional, though. Purely up to you.
Voila! (Picture #2, here.)

Part 2: The Key "Wrap"
Now, I'm sure you hate it when you can't for the life of you figure out which key goes to which lock. Especially when they're almost the same shape.
It's a struggle. Every day. 
I know they make those super cute covers for keys and whatnot. They're not that expensive, really. And I had some last year. They just... fell apart. About halfway through the year, my cute owl covers for my keys were useless.
Well, I came up with a clever, durable yet non-permanent (we wouldn't want Kelly to have to pay $50 for a set of "ruined"--read "embellished"--keys, now, would we?) solution to this pressing problem.
On one key, (I took the one to my office, as opposed to the one to the building), I made this cute little wrap. Super easy, super cute, and now you can make one too!

What you need:
key
fabric scraps
masking tape
glue

Here, I cut a bit of masking tape, enough to go around my key about one-and-a-half times, hot glued a strip of fabric to it, and wrapped it around the head of the key.
What did I tell you? Super easy, right?


This would be cute with just about anything. Fabric, paper, fake flowers... pompoms.... beatles... THE Beatles... You could also just wrap a bit of tape around there and doodle. Or just a piece of colorful duct tape or something. Get creative.
You can do it!


Saturday, August 25, 2012

Thrifting! For the win!

Dear millions of lovely readers,

We come to you this August from the sweltering campus of Northern Iowa, back from a day's haul of Thrifting Fun Times, sharing our lives with you.

Setting: Dana's dorm room

Dana and Kelly are sitting among a pile of clothes and random Goodwill finds.
Dana turns to Kelly.

Dana: Hey. Let's start a blog.
Kelly: YES.

So here we are.

While Kelly makes the blog, Dana dresses up pandas.

Dana: This is fun. He looks so foxy right now. Or she.
            This one looks like a... a... rodent.
            Now I know how those crazy Cabbage Patch people feel.


Kelly: I shall call him "Hans." And he shall be Swedish. And he shall be my Swedish Three-Legged Cat Necklace. 


Our mascot. The three-legged cat necklace named Hans.